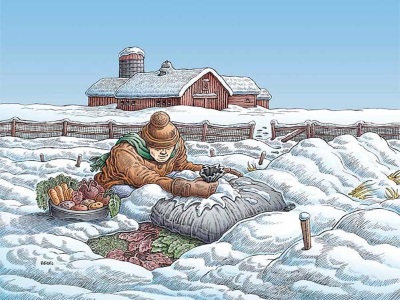
The biggest challenge, at least for me, with gardening is preserving the harvest. It makes me sick to think of the amount of food I have let go to waste through not having these skills. Root cellaring is something I am looking at hard as it is a no impact way to store food. It uses the earth to maintain the freshness of the crops stored within.
Straw Bale Easy Cellar
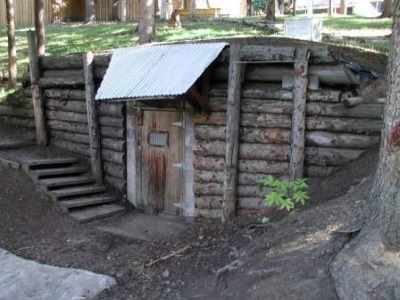
I had an idea to build a root cellar. The idea is to build a crawl space type root cellar with a ceiling that is maybe 3.5 or 4 feet high.
The wall where the door is would be cement blocks. The other walls would some cedar logs standing on end to create a structure strong enough to support a roof of cedar logs. Outside of the cedar logs walls would be an insulation wall constructed with straw bale for much of the insulation. including straw bale on top of the ceiling and walls. On top of all that would be a moisture barrier, and then a layer say 1 to 2 feet of dirt. The straw bale hopefully decreases the amount of dirt required, and the dirt in part is just there for added concealment if possible. The floor would have a layer of sand and a drainage ditch downhill.
Any food in there would ideally be sealed in some kind of tough container if possible so as to not give off too much odor for animals and make it hard to get into. I think small metal trashcans would be good to store the food in ..
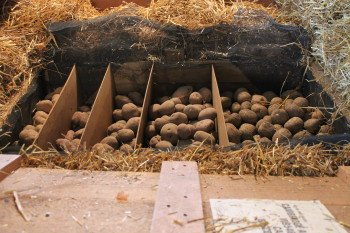
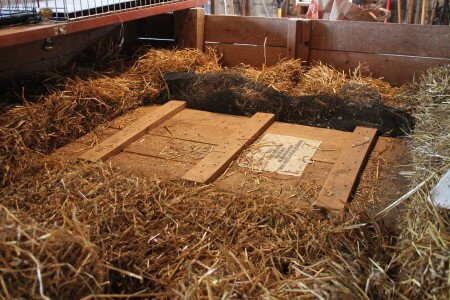
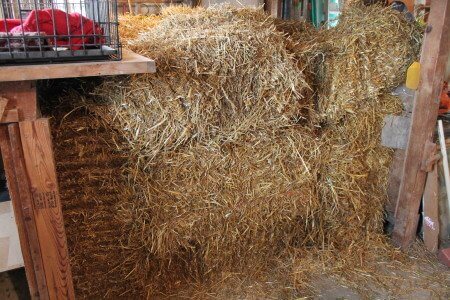
We had a huge potato harvest as the result of growing three beds rather than two and using seed potatoes from Wood Prairie Farm that gave us a much greater yield than previous seed sources. We ended up with over 300 pounds of potatoes from a 30 pound planting. I knew that if we didn’t find better storage than the basement, we would lose a lot of crop, so I made a quick cold storage set-up out of straw bales and an old wooden shipping crate. Using a small stall in our little barn and about 20 small square straw bales, we put around 200 pounds into storage. The five varieties are in the picture above.
The wood box is nested inside straw bales stacked up in a barn stall.
The potatoes were harvested by early October and they are looking very good. We’ve had a mild onset of winter so they haven’t been exposed to a hard freeze yet, but the barn gets pretty cold so I hope the straw does its job. I’m sure we’ll get them well into next year. I’ve used this set-up for carrots and other root crops, previously, and I’m quite confident it will work well for the potatoes. This isn’t the slickest option for cold storage, but it is definitely very easy.
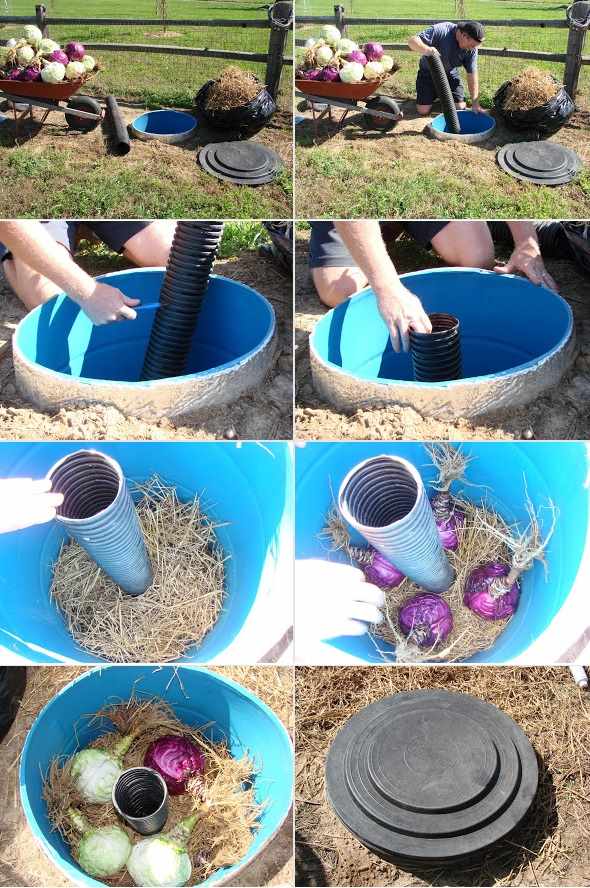
Building Barrel Root Cellars
This is a project building small root cellars out of 55 gallon plastic drums patterned from the information in Purdue Extension Application note HO-125. This is my nephew Ben lending me a hand. It is January and they are working great. Additional info: you do have to put a drain hole in the bottom for condensate. Just pour some water in the bottom and drill a 1/2′ hole in the center of where ever the water pools. The lids are uninsulated and in Jan and Feb with nightly lows in the teens, the temperature inside was 34F. This was with 4″ of straw thatch and 18″ of course thatch, covered with a tarp. Note that 34 degrees is ideal for a lot of vegs like cabbage. However, potatoes and fruits like it around 40-45F. I would recommend additional insulation on the exposed barrel and also insulating the lid. Also fruits like it drier and right now the barrels are at 95% humidity because I didn’t put the heavy thatch on until later. I would recommend for fruits to thatch the barrels completely from the start so the temperature is does not go up slightly during the day – which causes it to breath in humid air at night when the barrel top cools. Over time this condenses driving the humidity up. Thanks, I have some pictures if that would help.
Pallet Wood Root Cellar
All food stored in the root cellar should be of the dry variety, tightly sealed in dry containers. Rice, grains of all kinds, beans of all varieties, as well as packaged food items such as soups and similar items. The product of our food dehydrator is also stored down there. A typical meal example could be to select some beef stew base packets, boil some white beans, put in some dried carrots, tomatoes, and potatoes and with sourdough rolls enjoy a fine “backyard stew!”
Construction of the Pallet Root Cellar is very simple and can be made and put into use in a weekend. Here’s how:
- Collect six pallets from outside stores and garbage pick up points or the local furniture movers.
- Measure your pallets (usually 4’x4′) and dig a hole several inches bigger all round than the pallets. Be sure to allow enough depth for the top pallet to be below ground by 6″ when it is put on.
| Line the hole with a sheet of good thick plastic, the plastic should loosely drape in the hole. | |
| Place one pallet flat on the bottom for a “Floor.” Be careful not to tear the plastic liner. | |
| Standing on the floor pallet in the hole place the other pallets around the sides to make “Walls.” You will find that the pallets do not support each other because they are all the same size. | |
| Cut 2 pieces of 2’x4′ the same width as the floor pallet and attach it to the top of the end pallets or side pallets (it does not matter which) using bailing wire or thick string. Now the pallets will not cave in. | |
| Secure the four corners of the pallets to each other with wire or string and you will have a sturdy box to work with.Pull the plastic inside the box and, as you stand inside, pull loose dirt down around the sides of the box taking up the space between the outside walls of the box and the sides of the unit. Pack the dirt down and “firm up” the box before you get out. Then, from topside, walk around the box tamping down the dirt with your feet. When finished pull the plastic back out of the box and roll it up. |
Now you are ready to stock the box with food. I use 30 gallon plastic trash bins as containers and fill these first. Once food is placed in the storage unit, the top pallet should be put on. Pull the rolled plastic over the top to keep the inside cool.
You may decide to put hinges on the “lid,” as well as make shelves or other improvements to my basic design.
As soon as the unit is full, cover the lid with a good 3″ of newspaper, pull the plastic liner back in place and cover with a good strong plastic tarp. Then put rocks, bricks, or soil over the tarp to keep it in place.
That’s it. You are now the proud owner of your own “Root Cellar” full of food. If you are careful in packing the items, you should have many months of food down there. This item is good for most natural disasters (except, obviously, floods) and as can be readily appreciated. Even if the house is flat, your food is still there waiting to be used. I am sure many of you have already envisioned many “Root cellars” all over the yard, some with food, some water, or clothes or?
Info about building and managing your root cellar, plus printable plans. The book on building and using root cellars – The Complete Root Cellar Book.
Trash Can Root Cellar
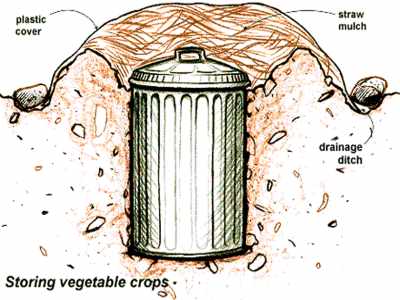
The trash can root cellar. Here is how it is done.
Start with a metal trash can with a tight-fitting lid. Dig a hole the diameter of the can and about as deep as the can is tall. Place some loose stones at the bottom of the hole (large enough to allow for drainage.) The can should sit with the top inch or so above the ground.
You will want to punch some holes in the bottom of the can to allow moisture to drain. You can use a drill, but I just drove a sixteen penny nail in with a hammer.
Put some straw in the bottom of the can and then layer in potatoes. Straw – potatoes – straw – potatoes. (Or other roots, but investigate crop compatability. Some foods store well but not with each other. For example, potatoes need cool, moist storage, whereas onions need cool, dry storage. Store apples with potatoes and ruin them both.)
Then place the lid on the can snugly. Cover the can with straw. (I fill a couple of potato or onion sacks with straw for ease of removal and replacement.)
Then lay a sheet of plywood over the whole thing and weight with a large rock or brick. This will keep the raccoons from opening it up. And the steel can will keep burrowing critters from raiding your larder.
 25 DIY Root Cellar Plans & Ideas to Keep Your Harvest Fresh Without Refrigerators
MAKE A COLD STORAGE ROOM IN YOUR BASEMENT
- Materials: vents, insulation, assorted wood, assorted tools
- Estimated Cost: Average – Expensive (depending on what supplies you already own)
- Difficulty Level: Medium-Difficult
- Description: If you have the space in your basement for a cold storage room, this might be the best solution for you. It does take some careful research to understand how to circulate the air in your new cold storage room and how to manage the temperature and humidity levels.
MAKE A ZEER POT
- Materials: 1 small clay pot with a lid, 1 large clay pot, sand, duct tape
- Estimated Cost: Cheap
- Difficulty Level: Easy
- Description: Zeer pots are pretty fascinating. They can keep your food cool due to water evaporation from the combo of a large clay pot, sand, and small clay pot. It’s easy to make and could be a fun way to teach science to your kids.
Our economy expends a huge amount of energy on refrigeration, not only to preserve food so that it can be shipped across the world and eaten fresh, but so that the food industry can recreate the climate conditions of a root cellar. The incredible diversity of flavors found in fermented foods, aged meats, wines, and cheeses were all developed around the world in the conditions found in local cellars. With the goal of preserving their harvest for more of the season, local artisans fermented, smoked, and salted foods before storing them in the cool natural conditions found several feet below the surface of the earth in a cellar.
How to Use Your Cellar
Unlike most other types of storage methods, you do not necessarily want your food to be sealed up in a container. The whole point of the root cellar is to expose your food items to the environment. Cardboard boxes, open buckets and baskets will all work relatively well. You just need to protect against pests. You can cover your containers with woven wire mesh screen to keep out any rodents, which will be a problem in many dirt floor cellars unless the floor is already lined with screen.
When storing root vegetables, do not wash them first. Leave them dirty, especially if you have pulled them yourself from the garden. Store-bought vegetables will have little dirt on them to start with so its not that important. This helps keep them moist in storage. Also leave on outer peels, rinds and leaves before storage. As natural as possible works best. A little added insulation inside each box is another good idea. Sawdust, wood shavings or even newspaper will work to pack your food in.
You should always keep an eye on a root cellar and inspect your food regularly. Anything that is starting to go bad should be removed immediately as it will spread quickly and ruin an entire basket or bushel. If anything is starting to shrivel or dry out, take it out for immediate use.
Ethylene Gas
There is one additional concern you have to be aware of with storing a variety of foods in a root cellar, and that is ethylene. It’s a natural gas given off by some fruits and vegetables as they ripen. Apples are particularly notorious for this. Too much of this gas building up in your root cellar will hasten ripening and further decomposition, which is obviously not desirable. With many root vegetables, like potatoes or carrots, it will cause them to toughen up considerably and get bitter so even if they do not rot, they will be inedible.
The easiest solution is to not store apples at all. But since they are one of the best fruits for root cellar storage, most people would rather not do that. Alternatively, you can keep your root cellar divided with separate vents and fresh air sources so that your fruit can be stored away from the other vegetables. This may be a possibility if you are constructing a sizable cellar in the first place or have a basement area that is divided into multiple rooms.
If neither of these suits, you will have to make do by storing your apples high within the cellar and close to the vents to let the gas escape without effecting the other food.
And apples are not the only culprits here, though they are typically the worst offenders. Pears, peaches, and cantaloupes are other fruits to watch out for.
Without this need to preserve food in the absence of refrigeration, we would not have most of our expensive, highly-valued foods and flavors. For these amazing flavors we are indebted to our fossil fuel deprived ancestors. There are many flavors being produced by the industrial food system, but they come from chemicals, preservatives, and artificial flavors. With the convenience of refrigeration, chemical preservatives, and artificial flavors the fossil fuel economy gives us, who needs fine wines, cheeses, charcuterie, or pickles? Wouldn’t you rather eat cheetos and velveeta?
Books can be your best pre-collapse investment.
Old Time Wisdom ( Timeless Bits of Wisdom on How to Grow Everything Organically, from the Good Old Days When Everyone Did you can prepare yourself for war by moving to the countryside and building a farm, but you must take guns with you, as the hordes of starving will be roaming. Also, even though the elite will have their safe havens and specialist shelters, they must be just as careful during the war as the ordinary civilians, because their shelters can still be compromised.”)
The Lost Ways (Learn the long forgotten secrets that helped our forefathers survive famines,wars,economic crisis and anything else life threw at them)
LOST WAYS 2 ( Word of the day: Prepare! And do it the old fashion way, like our fore-fathers did it and succeed long before us, because what lies ahead of us will require all the help we can get. Watch this video and learn the 3 skills that ensured our ancestors survival in hard times of famine and war.)

